Use Mate with Cheap Hardware
[Update: This whole post is a lie. See how Chrome is the culprit here. and see my confirmation that Cinnamon is fine here.]
A few weeks ago I switched to Linux Mint and chose the Cinnamon desktop. That turned out to be a disaster with my cheap Dell laptop (Vostro 1440). The performance was excruciatingly slow – apps would take tens of seconds to open, the mouse would freeze, etc. Switching to Mate has made it bearable. Unfortunately, switching the desktop, while doable (Google it) doesn’t work perfectly. I have duplicate items in some menus, or multiple ways to do the same thing. I never know when I’m going to see Nautilus or Caja when I open a folder.
Goodbye Ubuntu Desktop
As of about three weeks ago I’m using Linux Mint 13 with the Cinnamon desktop. I don’t even know what half of that means. I’m just doing what comes up by default. It’s nice to be back to a desktop that works for content producers – not that I produce that much content.
[Edit: Cinnamon runs fine on a low-powered computer like a Dell Vostro 1440, but don’t try to use Chrome.]
Getting to Xubuntu
I don’t want to start a flame war, but I’ve been unable to adjust to Unity. So I’ve been using Xubuntu for some months now. I just installed the Xubuntu packages over my Ubuntu 11.10 from the instructions here: http://www.psychocats.net/ubuntu/xfce.
After installing Xubuntu, some things still seemed to be weird. Much of it I could imagine might have to do with the fact that I had a lot of perhaps unnecessary Ubuntu stuff hanging around my system. So yesterday I finally followed the excellent instructions at: http://www.psychocats.net/ubuntu/purexfceoneiric to get rid of the unnecessary stuff.
I had to reinstall LibreOffice and a few other packages after following the instructions. It’s worthwhile to capture the output of the command given by the link above, so you can see what’s been removed.
I had one obscure problem that gave me many hours of angst. When I restarted my computer, it wouldn’t boot. By booting to a live CD and checking /var/log/syslog, and Googling, I discovered that /etc/lightdm/lightdm.conf was sending me to the unity-greeter. I had to change /etc/lightdm/lightdm.conf to look like this, and then I could happily boot again:
[SeatDefaults]
greeter-session=lightdm-gtk-greeter
user-session=
I knew that after switching to Xubuntu but before following the above instructions, my startup was still going to the Ubuntu login screen, rather than the Xubuntu login screen. Part of the reason I was trying to go to “pure” Xubuntu was to get rid of the Ubuntu login and get to a pure Xubuntu experience.
I can’t say enough good things about pyschocats. She has done an excellent job of documenting a number of tricky topics.
Sluggish Ubuntu Video
| Since I got my Dell Vostro 1440, I felt that it wasn’t quite as responsive as it should have been. Yesterday I spent a little time trying to figure out why that might be. (A little time – like all morning.) I stumbled across what seemed like good instructions on troubleshooting Linux video. At the start of all the instructions was a warning to make sure the user was in the video group. If not, the user’s desktop wouldn’t be able to use the graphics hardware. |
Well I checked my groups, and sure enough I wasn’t in the video group. I added myself to the video group, and after logging out and in, and a day of use, I’m confident in saying that the desktop is much more responsive.
| More Googling turned up a useful command: ‘glxinfo | grep “direct rendering”’. It will tell you “yes” if you’re going straight to the graphics hardware. |
Installing Ruby on Rails on Ubuntu 11.10
[I’ve made an important change to this post – steps 3 and 4 below are new. Apologies to anyone I’ve lead astray.]
I’m back to playing with Rails a bit. NetBeans for Ruby is gone, so
I’m going to do things the macho Rails way and just develop with an
editor and a bunch of terminal windows. (One of my open source rules is
“do whatever everyone else is doing.” Trying to use an IDE with Rails
was always a violation of that rule.)
{: .Apple-interchange-newline}rvm is a great
idea. I found it really helpful to read about named gemsets early on. I had to install rvm, then install rails and
a few other packages.
- Install the Ruby Version Manager (rvm) from [these instructions][4]{: target="_blank"}
- Put this line at the end of your .bashrc: "\[\[ -s "$HOME/.rvm/scripts/rvm" \]\] && . "$HOME/.rvm/scripts/rvm" # Load RVM function"
- Run "rvm requirements" in a terminal window
- Install all the packages the output of "rvm requirements" tells you to install (apt-get install...). You must do this before you start installing any rubies with rvm. If you don't, you may have all sorts of problems crop up later, like weird messages from irb ("Readline was unable to be required, if you need completion or history install readline then reinstall the ruby.")
- Do the following in a terminal window:
rvm 1.9.3
rvm --default 1.9.3
gem install rails
sudo apt-get install sqlite
sudo apt-get install libsqlite3-dev
sudo apt-get install nodejs
Now create an application to test:
rails new testapp
cd testapp
rails server
Browse to localhost:3000 and you should see the Rails default page.
Manual Two-Sided Printing
In my home office, I have a multi-function printer that does pretty much everything I typically need, except printing two sides. Here’s how I get two-sided printing when I need it.
The printer is an HP CM1312nfi. It prints on the side of the paper facing up in the paper tray. The “far end” of the paper in the paper tray is the top of the page.
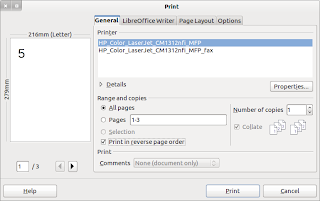
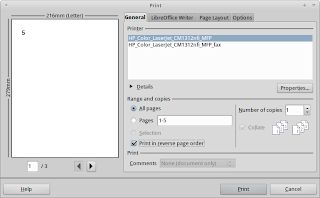
I print the even-numbered pages first. These are the “back side” or “left pages”.
<div class="separator" style="clear: both; text-align:
center;"> </div>
Print in reverse order.
<div class="separator" style="clear: both; text-align:
center;"> </div>
I take the paper from the output tray, and turn it so that the blank
side is up, and the top goes into the far side of the paper tray.
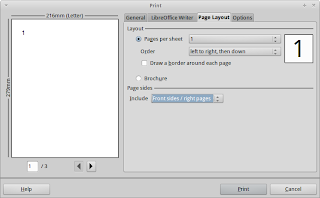
Then I print the odd-numbered pages. These are the “right side pages”.
<div class="separator" style="clear: both; text-align:
center;"> </div><div
class="separator" style="clear: both; text-align: center;"></div>
Print in forward order.
<div class="separator" style="clear: both; text-align:
center;"> </div><div
class="separator" style="clear: both; text-align: center;"></div>
This only works for one copy at a time if I have an odd number of pages
in the document. That’s because you need one extra page when you print
the second time to get the odd number of pages.
The screen shots are LibreOffice 3.4.4.
Archive
-
2008
- November
- October
- September
- August
- July
- June
- May
- April
- Is This the Beginning of the End for Microsoft... (25)
- NetBeans Out of Memory Updating Ruby Gems (24)
- MySQL From Remote Host (22)
- Tape Rotation with Bacula (22)
- Securing DNS/bind/named (19)
- Building A DHCP/DNS Server (17)
- Challenge # 42 of Healthcare IT (15)
- Bacula Catalog Job and MySQL (14)
- Bacula Notes (13)
- Accessing a SCSI Tape Drive from a VM (12)
- Another SCSI Package (11)
- Installing Bacula (10)
- Bacula: Backups (09)
- Copying VMs (09)
- Firewall on the VM Quick Reference (08)
- ntp on the VM (08)
- March
- SNMP on the VM (30)
- SNMP (29)
- Basic Tiny VM Part 1 (26)
- Can't Connect to Console of VMs (26)
- VMWare Server on Ubuntu 6.06.1 (24)
- Virtualization So Far (24)
- Ubuntu 6.06.1 on Dell SC440 (24)
- Mount a USB Drive on Ubuntu 6.06.1 (24)
- Installing the Xen Guest Agent on an Ubuntu VM (18)
- Installing Ubuntu on Xen (18)
- Ubuntu on Xen (16)
- First Guest on Xen (16)
- If IT Isn't Broken... (16)
- XenServer Install (15)
- Why Open Source is Better for Us All (14)
- February
- January
-
2007
- November
- October
- August
- July
- June
- May
- Google and Healthcare IT (30)
- Anti-Economies of Scale (26)
- Why Agile Software Development isn't More Prevalent (22)
- Talk About Missing the Mark (20)
- Eggs and Baskets (16)
- NEC Storage Devices (11)
- Test Everything - Yeah, Right (09)
- Business Impact of IT (08)
- Change Management and Project Management (07)
- April